Connecting a P trap to a wall drain is essential in installing a sink or washing machine. It prevents foul-smelling sewer gases from entering the living space.
Improper installation can lead to leaks and unpleasant odors, which can be hazardous to health. In this article, we will guide you through how to connect P trap to wall drain, step by step, to ensure a proper and secure installation.
Whether you are a DIY enthusiast or a novice plumber, this guide will help you complete the task successfully.
By the end of this guide, you will have the confidence to connect a P trap to a wall drain without professional help. So, let’s get started and learn how to do it correctly.
How to Connect P Trap to Wall Drain: You Need Only 5 Steps
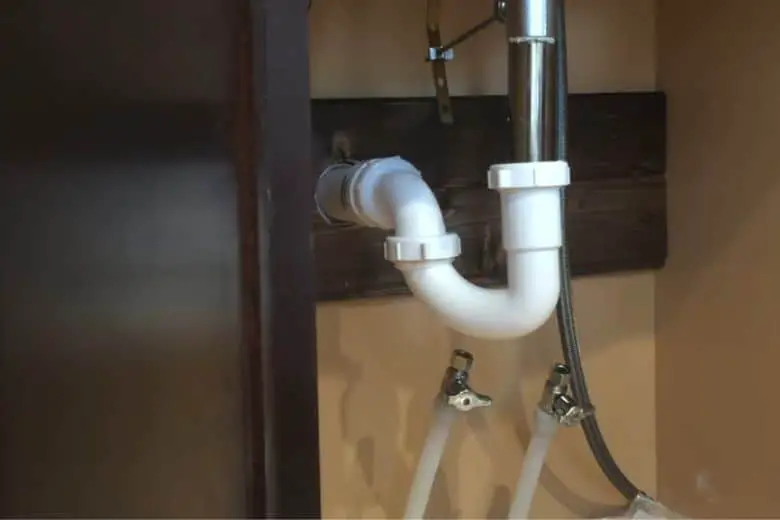
The P-trap is a delicate component in plumbing systems that prevents unpleasant odors from entering your home. It is a small curved pipe holding water, usually found beneath the sink.
The water in the P-trap forms a barrier that blocks odors from the main sewer line. It also prevents debris and other materials from clogging the plumbing system by catching them in the water.
To connect the P-trap to the wall drain, you need to prepare everything you will need first. It includes the appropriate piping, tools, and sealant. Once you have everything, you can connect the P-trap to the wall drain, ensuring a tight and secure fit to prevent leaks.
Proper installation of the P-trap is essential for maintaining a healthy and functional plumbing system. Let’s find out the practical and straightforward process of connecting a p trap to a wall drain.
You will need the following tools and components:
- P-trap kit, which includes the trap and necessary pipes.
- Slip-joint pliers or an adjustable wrench for tightening and loosening nuts and bolts.
- Teflon tape to ensure a tight seal and prevent leaks.
- Pipe cutter or hacksaw to cut the pipes to the appropriate length.
- Bucket or container to catch any water or debris that may come out during installation.
- Putty knife for applying sealant or putty to the pipes.
- New tailpiece to connect the sink drain to the P-trap.
- T-fitting for connecting the P-trap to the wall drain.
- Silicone sealant or plumber’s putty for sealing the connections.
- Rags or towels for cleaning up any spills or leaks.
These tools and components are essential for proper installation. They will ensure a secure and leak-free connection between the sink and wall drain. It is vital to follow the installation instructions carefully and use the appropriate tools and components for your specific plumbing system. However, if you are inexperienced with plumbing work, seek a professional plumber’s help to ensure a successful installation.
Step 1: Install a Tailpiece for Your Sink and P-Trap
Generally, old plumbing systems lack tailpieces in the kitchen or bathroom sink.
Consequently, installing a tailpiece is the first step in setting up a new P-trap or remodeling your existing sink setup. The tailpiece connects the sink to the P-trap and improves the draining efficiency of the sink.
Here’s a step-by-step guide to installing a tailpiece:
- Locate the flared end of the draining pipe and carefully slip the tailpiece section’s washer through it.
- Use a slip nut to attach the tailpiece to the sink’s strainer and tighten it with an adjustable wrench.
- If you have two sinks in the same room, you can use a single P-trap for both. Install a new sanitary tee on the tailpiece section and connect it securely to the P-trap.
- For bathroom sinks, the tailpiece extension may already be present. Still, if you need to extend it further to connect with the P-trap, you can cut it to the appropriate length with a hacksaw.
- Mark the length where you need to cut the tailpiece, hold it with one hand, and use your dominant hand to cut it with the hacksaw.
Following these steps, you can easily install the tailpiece to connect your sink to the P-trap underneath it, ensuring proper draining and preventing any clogs or leaks.
Step 2: Connecting process of the p trap and tailpiece
- After installing the tailpiece, the next step is to connect it to the P-trap. This process involves connecting the U-bend and P-trap arm using slip nuts. Here’s how to do it:
- Disconnect the P-trap arm to make it easier to connect the tailpiece section. Disconnect the P-trap arm from the U-bend section.
- After disconnecting the P-trap arm, connect the tailpiece section to the long side of the U-bend section using slip nuts.
- Now carefully align the opening of the long arm of the U-bend with the wall drain.
- Once you’ve aligned the U-bend arm opening with the wall drain, connect the tailpiece to the P-trap using slip nuts.
- Finally, use slip nuts and an adjustable wrench to tighten the connections between the tailpiece, U-bend, and P-trap. Remember to tighten the nuts only slightly to hold the connection in place.
Step 3: Attaching the P Trap Arm to the Wall Drain
To connect a wall drain to a p trap arm, you need to follow these steps:
- Slip a rubber washer onto the p trap arm to create a seal to prevent water leakage.
- Locate the stab out of the wall drain and carefully push the p-trap arm into it. Make sure it fits securely and snugly.
- If the p-trap arm is too long, you can adjust its length using a hacksaw.
- Fasten the connection by tightening the slip nuts. Be sure to tighten the nuts only slightly to hold the connection in place, as you may need to make adjustments later.
Step 4: Finalizing the P Trap and Wall Drain Connection
Connect the stab out with the p trap to complete the installation process.
Follow the steps below to ensure a secure and leak-free connection:
- Align the U-bend with the stab out and adjust the alignment until the p-trap arm and U-bend section are correctly aligned.
- Fasten the connection with slip nuts, and tighten them with your hands or an adjustable wrench.
- Finally, tighten the slip nuts used in the tailpiece and p-trap arm connection.
- Turn on the kitchen or bathroom sink faucet and wait a few minutes to check for leaks in the p trap and wall drain connection.
- Allow 25 to 40 minutes for the entire plumbing connection process, and be patient to ensure a proper installation.
Step 5: Final Check for Leaks
Once you have completed the connection of the p trap to the wall drain, performing a final check for leaks is required.
Here’s what you need to do:
- Start by turning on the kitchen or bathroom sink faucet and letting the water flow for a few minutes.
- After a few minutes, check the p trap and wall drain connection for any signs of leakage. If you notice any leaks, you may need to tighten the slip nuts further or check for misalignments.
- If you need to tighten the slip nuts, use an adjustable wrench. Moreover, be careful not to overtighten them as it can damage the plumbing.
- Once you have made any necessary adjustments, turn on the faucet again and wait for a few more minutes. If you have set up the p trap correctly, you should see leak-free drainage in the sink.
Remember to check these steps because it helps you to ensure that your p trap and wall drain connection is secure and leak-free. Therefore, it will give you peace of mind and a functional plumbing system.
The thing you need to consider while connecting a P trap to a wall drain:
Although connecting a p- trap to a wall drain is not rocket science. Despite this fact, you should take some precautions at the time of combining them.
- Make sure to turn off the water supply to the sink before you start the installation.
- It’s always recommended to wear gloves, goggles, and a mask when working with plumbing tools and materials to avoid injury.
- Before installing, ensure all the parts are present, undamaged, and in good condition.
- Proper alignment is crucial to avoid leaks. Make sure that the P trap and all its connections are lined up correctly.
- Always use slip nuts to secure the connections, and tighten them properly to avoid leaks.
- While tightening the connections, avoid over-tightening the slip nuts, as it can damage the parts.
- After installing, turn on the water supply and check for any leaks. Turn off the water and recheck the connections if there are any leaks.
Reasons Why You Should Use a P Trap in Plumbing Systems
You must pay attention to using p-trap in your home for multiple reasons. We have pointed out a few reasons. Have a look.
1. Prevents Sewer Gas from Entering Your Home: The primary reason for installing a P trap is to prevent sewer gases from entering your living space. It works by trapping a small amount of water in the bend, which creates a barrier that prevents the gases from flowing back into your home.
2. Protects Your Health: Sewer gases can cause various health issues, such as headaches, dizziness, and nausea. Inhaling these gases can even lead to more severe health problems.
3. Avoids Clogging Your Drainage System: The P trap is also an effective tool for preventing blockages in your drainage system. The curved shape of the P trap captures debris and hair, which prevents them from flowing into the primary drainage system.
4. Provides Easy Access for Cleaning: The P trap’s unique shape makes it easy to access and clean when necessary. You can remove the trap and clean any debris or blockages by unscrewing the slip nuts.
Overall, using a P trap is beneficial in any plumbing installation. It helps prevent sewer gas from entering your home, protects your health, prevents clogging of your drainage system, and provides easy access for cleaning and maintenance.
Frequently Asked Questions:
Can the P trap be installed directly below the drain?
Answer: No, the P trap should not be installed directly below the drain. If you do so, it will have to work against gravity, leading to slow draining and potential clogs. The water should flow through the P trap naturally, so installing it at the correct height is necessary.
What is the recommended distance for the P-trap to be located below the drain?
Answer: The P-trap should be located within 24 inches of the sink’s drainage system. If the wall drain is located below this distance. You need to raise it before connecting the P-trap to avoid slow drainage or potential clogging.
What is the process for connecting a metal wall drain to a p-trap?
Answer: Connecting a metal wall drain to a p-trap is similar to attaching a plastic wall drain. You must slip a rubber washer through the p-trap arm and insert it carefully into the stab out of the wall drain. Then, adjust the arm’s length using a hacksaw, and fasten the connection with slip nuts.
Finally, align the U-bend with the stab out, fasten it with slip nuts, and check for leaks. However, it is essential to make sure that the metal wall drain and p-trap are compatible and have the same diameter to ensure a secure connection.
What is the correct orientation for the P-trap during installation?
Answer: During installation, you should connect the curved end of the P-trap to the shower or wall drain and connect the straighter part of the P-trap to the 90-degree elbow or tailpiece.
Conclusion
In conclusion, you can connect the P trap to the wall drain with just a few basic tools and careful attention to detail, making it a relatively simple task. Following the five easy steps outlined in this guide, you can successfully complete this plumbing project and save money by hiring a professional plumber. Remember to take the necessary precautions.
With a little patience and effort, you can successfully connect your P trap to the wall drain and enjoy a fully functional sink.
Paul Newman is a blogger who writes about plumbing and home improvement. Over the past 20 years, I have worked as a plumber. My passion is to share my knowledge and experience with others to improve their homes.