In numerous regions, it is mandatory to follow building codes that require ventilation of the kitchen sink plumbing system in homes. It is crucial to ensure proper drainage and increase its durability. Ventilation of the kitchen sink system is typically a straightforward process without any significant obstacles.
However, issues may arise when a window obstructs the path of the kitchen sink ventilation, making it a daunting and challenging task for you. Therefore, we have created this article to guide you on how to vent a kitchen sink under a window.
Typically, homeowners place a window near their kitchen sink to enjoy natural views while using the sink and to reduce any unpleasant odors in the indoor area. However, the situation becomes unpleasant when the window obstructs the kitchen sink vent.
To bypass the window, position the venting pipe horizontally underneath it and ensure it connects smoothly with the main venting line. The only challenge you may encounter is ensuring the vent slopes upwards until it connects to the mainline.
Let’s now move on to the simple steps for venting a kitchen sink under a window.
How to Vent A Kitchen Sink Under A Window
When you first look at it, installing a vent for your kitchen sink beneath a window may seem difficult. However, in reality, it is easier than you might think. Even if you find it challenging, there are seven steps that you can follow to make the installation process fast and easy.
Step 1: Gather all the Necessary Equipment and Supplies
One of the primary obstacles in installing the vent beneath the window is ensuring that all the necessary tools and materials are collected and organized correctly. It is because installing an under-sink vent entails using multiple tools and materials.
- 15/8” drill and corresponding drill bit
- Phillips screwdriver
- Hammer
- 1-1/2″ ABS or PVC pipe
- Sanitary tee (made of ABS or PVC)
- 90-degree long sweep elbow pipes (approximately 1-1/2″ in diameter)
- Connectors and cement
- Y-connectors
- Tape measure
- Level
- Chalk line
Once you have gathered all the necessary tools and materials, you can begin installing the kitchen sink vent. However, it is advisable to consult with your local county regulations, as some regions may only allow individuals to adjust their plumbing systems with the assistance of professionals. In other areas, you may need to obtain official confirmation for any changes you make to your plumbing plan.
Step 2: Take Measurements for the Venting Distance
To determine the required length of the venting pipe for your project, you must accurately measure the distance between the primary venting line and the kitchen sink. Using a tape measure, measure the distance between your kitchen sink and the primary vents in your home.
Typically, the primary vent of your home will be located in the attic or inside the walls. Besides, the location of the air gap should be within the kitchen sink unless someone has relocated it from its original position.
When measuring the distance between the vent and the kitchen sink, ensure that you accurately located the vent. Additionally, consider the sanitary tee’s placement, which should be positioned near the kitchen sink and not exceed a distance of 3.5 feet away from the sink.
Once you have located the vent, begin measuring the distance. Start by measuring the distance between the kitchen sink and the p-trap. Then, measure the distance between the vent and the p-trap of the kitchen sink.
Step 3: Gain Access to the Vent
In most homes, the primary vent pipe is located inside the wall, which means you will need to access it to connect the kitchen sink vent. To accomplish this, you must remove the baseboard or wooden board from the wall to gain access.
Use a hammer and screwdriver to access the wall and remove the baseboard. Tap the screwdriver drill bit with the hammer to loosen the baseboard, and once it becomes loose, you can easily remove it from the wall.
Step 4: Sketch the Trajectory of the Vent
As previously mentioned, the vent from the kitchen sink must always follow an upward trajectory to connect with the main vent. Therefore, it is crucial to draw the upward trajectory accurately. Failure to do so may result in a faulty upward climb of the vent pipe.
Therefore, it is essential to have a proper understanding of the kitchen sink vent diagram. According to the International Residential Code, the vent in your kitchen sink system must rise at least ¼” for every foot. Therefore, if your vent is 10 feet long, it will require a climb of 2.5 inches from the starting point to the main vent pipe inside the wall.
Expert plumbers recommend using a 45-degree angle to ensure the vent climbs properly. Maintain this angle until you meet one of the following two conditions.
- Until the kitchen sink vent reaches a height of 6 inches.
- Until it reaches a point higher than the highest fixture in the kitchen.
We suggest using a digital level to ensure precise measurement of the slope. The level should have markings indicating a rise of every 1/8 inch. Additionally, while marking the slope, use chalk to draw the trajectory of the vent pipe with a slight upward angle. It will aid in the proper installation of the vent.
Step 5: Make the Holes
After outlining the vent pipe trajectory with chalk, drill holes along the marked line. However, be cautious not to drill holes that can cause any structural damage to the wall.
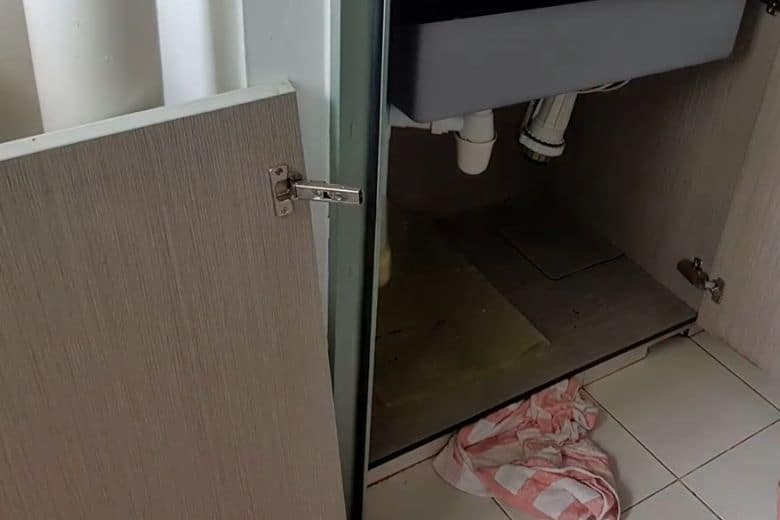
If drilling holes through the wall seems unfavorable, installing the vent pipe through the cabinet is another option. Ensure that you have a clear view of both the inside of the cabinet and the wall to install the vent pipe correctly. Verify with your local building and plumbing codes to ensure that installing the vent pipe through the cabinet is allowed. Also, avoid drilling holes in any beams that directly support your building.
Now that we’ve discussed the key factors to remember when drilling holes along the marked trajectory let’s explore the process.
- Connect the drill bit with the drill and plug it into the power outlet. Make sure to adjust the speed properly to drill holes through the wall. Also, drill the holes straight to ensure the vent pipe fits perfectly. Avoid deviating from the chalk-marked trajectory.
- To achieve a secure fit for the vent pipe, drill the holes straightly. Any deviation from the chalk-drawn trajectory may cause an incorrect installation. Therefore, paying attention to drilling holes in a straight line is essential.
Step 6: Mounting the Vent Pipe
It’s time to connect the vent pipe to the main vent and install it properly. First, cut the pipe to the appropriate length and then attach it to the main vent. Finally, use glue to secure it for the best possible fit.
To begin with, mount the sanitary tee by placing the 2″ x 2″ side through the P-trap, and ensure that the 1-1/2″ side is facing upwards. It is essential to keep the maximum distance between the bottom of the P-trap and the 1-1/2″ side of the sanitary tee less than 3.5″ for optimal installation.
Afterwards, connect the 1-1/2-inch PVC or ABS pipe to the long sweep 90-degree elbow pipe with appropriate fittings. The elbow pipe should face the wall. Then, insert the longer PVC pipe through the hole in the wall and connect it securely.
However, the long PVC pipe may not be sufficient to reach from the kitchen sink to the wall and ultimately connect with the main vent. Therefore, you will need to use joints to support the pipe and cover the extended distance. It’s crucial to add the joints cautiously to avoid overuse.
It would help if you kept working with the PVC pipe until it rises at least 6 inches above all the kitchen fixtures. Then, you must connect the kitchen sink vent to the main vent of your house. However, it’s not possible to connect these two vent pipes directly.
To join the two vent pipes:
- Use a Y-connector appropriately.
- Cut the main vent and connect the Y-connector, ensuring the Y-part faces downwards.
- Connect the kitchen sink vent to the downward section of the Y-connector.
Step 7: Apply Adhesive and Complete the Job
Apply PVC cement to the entire vent connection to secure the joints. Allow 20 to 30 hours for the cement to dry completely before using the kitchen sink. Finally, install a baseboard or wooden board to conceal the vent and complete the task.
Precautions to Consider when Venting a Kitchen Sink Under a Window:
- Check Local Building Codes: Before you begin any work, you must check local building codes to ensure your project complies with regulations. Some areas may require venting kitchen sinks, so do your research first.
- Avoid Drilling into the Wall: If possible, avoid drilling holes through the wall when venting your kitchen sink. Drilling holes can cause structural damage to the wall, which can be costly to repair. Consider alternative options, such as installing the vent pipe through the cabinet.
- Use a Digital Level: To ensure accuracy, use a digital level to measure the slope of the vent pipe. It will help you install it correctly and prevent any potential issues with drainage.
- Drill Holes Carefully: Do it carefully and straight if you need to drill holes. It will help ensure the vent pipe fits snugly and securely.
- Use Joints Sparingly: When connecting multiple pieces of PVC pipe, use joints sparingly. Overuse of joints can weaken the overall structure and may result in leaks.
- Allow Time for the Cement to Dry: Once the vent is installed, apply PVC cement and allow 20 to 30 hours to dry properly. Avoid using the kitchen sink during this time to prevent any potential issues with the cement drying.
Frequently Asked Questions
Does a kitchen sink drain need to be vented?
Answer: Yes, you need to vent the kitchen sink drain as it is mandatory in many regions and helps to improve water flow by allowing air to enter the draining pipe.
What happens if a kitchen sink doesn’t have a vent?
Answer: If a kitchen sink doesn’t have a vent, it can cause various issues, such as slow drainage, gurgling sounds, unpleasant odors, and even water backup. Without proper venting, the pressure in the drain system can build up and impede the flow of water, leading to clogs and other problems.
How high should a window be above a kitchen sink?
Answer: In a typical kitchen setup, the window is placed at the height of 2″ to 5″ above the sink and countertop. To provide enough space, the sink and windows are usually installed at the height of 34-1/2″ to 37″ above the floor. Additionally, the sink has an extra height of 1-1/2″ to accommodate the counter.
Does the kitchen sink need an air gap?
Answer: In many regions, it is mandatory to have an air gap installed for kitchen sinks. An air gap prevents contaminated water from flowing back into the sink’s clean water supply, which can cause health hazards.
Can you put a sink in front of a window?
Answer: You can install a kitchen sink in front of a window. If there’s no cabinet above the sink, you can place it directly in front of the window to take advantage of better ventilation.
Conclusion
If a window is obstructing the kitchen sink vent from connecting to the main vent, don’t worry. Venting a kitchen sink under a window can be easily managed by following these guidelines. You don’t need any special skills, just outline the slope of the vent pipe and connect it to the main system under the window.
Paul Newman is a blogger who writes about plumbing and home improvement. Over the past 20 years, I have worked as a plumber. My passion is to share my knowledge and experience with others to improve their homes.