
Alright, let’s jump into something that might seem a bit tricky but trust me, it’s easier than you think! Picture this: You’re trying to clean your faucet, and you realize that your aerator is recessed and, oh no, you don’t have the key!
No doubt, immediately, you will be trying to figure out how to remove recessed faucet aerator without key. Hang tight because we’ve got the golden nuggets that will make this daunting task a breeze. No more wrestling with that stubborn faucet!
Before you start panicking, let me guide you through the first straight process.
The solution is simple and effective. All you need is a pair of needle-nose pliers, a flathead screwdriver, and some good elbow grease. Insert the pliers into the aerator’s notches, grip, and twist counter-clockwise to loosen. Once it’s loose, you can unscrew it by hand or use the screwdriver for extra torque. That’s it! Your water flow should now be unimpeded and ready for action.
Does it sound complex? Let’s move to our step-by-step procedure. There are other ways to crack the code of removing a recessed aerator sans key.
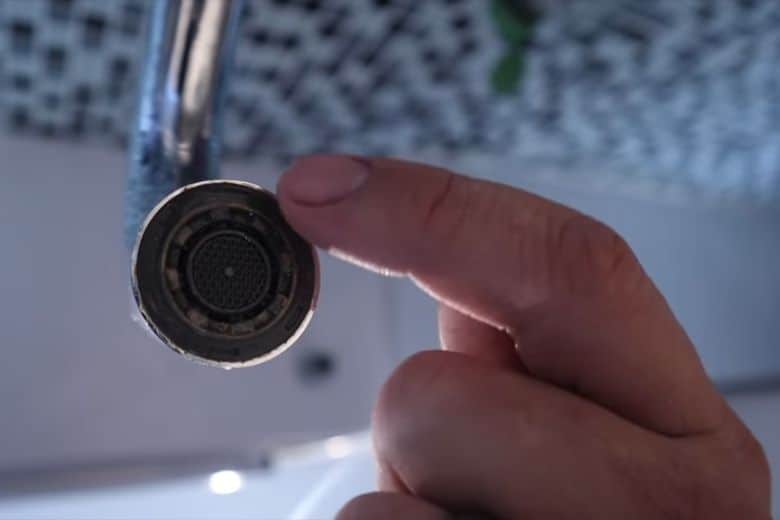
The Aerator: What’s the Big Deal?
A faucet aerator is a device fixed to the faucet spout’s end. Generally, it’s responsible for controlling the stream of water by adding air, reducing splashes, and saving water consumption.
Why does this tiny thing matter? An aerator saves water, prevents splashing, and shapes the water stream from the faucet. Imagine washing your hands under a waterfall; not practical, right?
The aerator makes sure that doesn’t happen.
There are Several Types of Faucet Aerators. Have a Look.
- Standard Aerator: This is the most common type; it screws directly onto the faucet head and has a mesh screen to distribute the flow of the water evenly.
- Recessed Aerator: A recessed faucet aerator, also known as a cache aerator, is a type of aerator hidden or screwed inside the faucet instead of being exposed outside like a standard aerator. This design gives the faucet a more streamlined and sleek appearance, as the aerator is not visible outside.
- Swivel Aerator: This type can swivel around 360 degrees. It offers more flexibility and control over the direction of the water stream.
- Low-Flow Aerator: As the name suggests, these are designed to reduce the amount of water that flows through the faucet. They are ideal for water conservation purposes.
- Tamper-Proof Aerator: This type is designed to be challenging to remove, which can be helpful in public spaces where vandalism or theft might be a concern.
Why Would You Need to Remove a Recessed Faucet Aerator?
You may need to remove a recessed faucet aerator for several reasons. It could be due to a clogged aerator, which affects the water flow and pressure. Because cleaning or replacing a clogged aerator can help restore optimal performance.
On the other hand, if you notice inconsistent water flow, weird noises, or an over-enthusiastic spray that’s more like a surprise splash party, your aerator needs attention. Additionally, you may want to install a water-saving aerator or replace a damaged one.
Whatever the reason, let’s explore how to remove a recessed faucet aerator without a key.
Dealing with Diverse Faucet Brands
- Getting to Know Your Moen: Moen is the Rolls Royce of faucets. With these high fliers, you’ll want to tread carefully. The “Flathead Friend” method is a good choice here.
- Tackling the Delta: Delta faucets often sport recessed aerators. Luckily, you’re now a pro at removing a recessed faucet aerator without a key, so bring it on!
- Taking on the Kohler: Kohler faucets are top-notch, and removing their aerators requires finesse. The “Vinegar Victory” approach might save the day.
Steps to Remove the Recessed Aerator Without a Key
It’s time to gather your tools. Ideally, you’d use an aerator key. But since you don’t have one, let’s get creative!
Common Household Alternatives Tools
- Needle-nose pliers
- Flat-head screwdriver
- Adjustable wrench
- Cloth or rubber grip
- Lubricant (optional)
Here we go, step by step. Please stick with me; your aerator will be out before you know it.
Step 1: Prepare the Work Area
- Clear any items around the sink to avoid accidental damage or obstruction.
- Place a cloth or towel on the countertop or inside the sink to catch any dropped parts or water.
Step 2: Turn Off the Water
Before wrestling with the faucet, ensure the water supply is turned off. Otherwise, you might be in for an unexpected shower.
Step 3: Protect the Faucet
Wrap a cloth around the faucet to protect it. You don’t want to leave battle scars on your faucet.
Step 4: Grip the Aerator
Clamp onto the aerator using pliers with rubber bands wrapped around them (for grip). Like how a rock climber needs a good grip, so do you!
Step 5: Unscrew the Aerator
Turn the pliers counterclockwise to unscrew the aerator. Like opening a jar of pickles, it might take some muscle. Don’t give up!
Step 6: Clean and Replace
Once it’s off, clean the aerator and faucet threads. Now, either replace the old aerator with a new one or screw the cleaned one back on.
Step 7: Reassemble and Test
Now reassemble the aerator and attach it back to the faucet. Turn on the water supply and check for a smooth flow.
Alternative Methods to Remove Recessed Faucet Aerator Without Key
If your household is absent from our previous tool, then you can follow the below methods.
Method 1: Using a Coin
A coin can be a useful alternative when you don’t have specialized tools. Choose a coin that fits into the notches of the aerator. Place the coin in one of the notches, grip it tightly, and turn it counterclockwise. The coin’s edge should provide enough leverage to loosen the aerator and allow you to remove it.
Method 2: Using Vinegar or Lime Dissolver
Sometimes, mineral deposits can cause the aerator to become stuck. In such cases, vinegar or a lime dissolver can help dissolve the buildup. Remove the aerator’s outer cap, if possible, and submerge the aerator in a bowl filled with vinegar or a lime dissolver solution.
Allow it to soak for a few hours or overnight. The solution will dissolve the mineral deposits, making it easier to remove the aerator using any of the methods mentioned above.
Precautions to Take
When attempting to remove a recessed faucet aerator without a key, taking certain precautions is essential. Always ensure the faucet is turned off before starting the removal process. Protect the aerator and faucet from scratches by wrapping them with a cloth.
When turning, apply gentle, steady pressure to avoid damaging the aerator or faucet. If you encounter any difficulties or the aerator remains stuck, it’s recommended to seek professional assistance.
Additional Tips
- Applying heat to the faucet using a hairdryer or warm water can help expand the metal and facilitate easier removal.
- If all else fails, consider seeking assistance from a professional plumber to avoid causing further damage.
Frequently Asked Questions
What should I do if the aerator remains stuck after attempting these methods?
Answer: If you encounter difficulties, it’s advisable to seek professional assistance to avoid damaging the aerator or faucet.
Can I use a credit card instead of a coin to remove the aerator?
Answer: While a credit card might sometimes work, a coin with notches provides better leverage for easier removal.
Will using a screwdriver scratch the aerator?
Answer: Wrap a cloth around the aerator before using a screwdriver to avoid scratches.
What if none of the methods work?
Answer: If none of the methods mentioned in this article works, it may be beneficial to consult a professional plumber. They have the experience and specialized tools to remove stuck or stubborn aerators.
Can I use a lubricant to loosen a stuck aerator?
Answer: Yes, lubricants are another effective way to loosen a stuck aerator. Spray it around the aerator’s threads, allow it to penetrate for a few minutes, and then attempt removal using the appropriate method.
Are there any risks involved in removing a recessed faucet aerator?
Answer: Removing a recessed faucet aerator typically does not pose significant risks. However, it’s important to exercise caution to avoid damaging the aerator or the faucet itself. Using proper tools, protecting the aerator’s surface, and following the recommended techniques will minimize any potential risks.
Conclusion
Congratulations! You have successfully removed a recessed faucet aerator without a key.
We have equipped you with vital knowledge and steps on how to remove recessed faucet aerator without key. Remember, you must approach this task with patience and the right tools. Regular maintenance is imperative for the longevity of your faucet aerator.
Paul Newman is a blogger who writes about plumbing and home improvement. Over the past 20 years, I have worked as a plumber. My passion is to share my knowledge and experience with others to improve their homes.


